AppLovin Custom Adapter
Android Ads SDK supports integration with the AppLovin MAX monetization platform. Currently, the following ad formats are integrated:
- Banner Ads
AppLovin SDK Integration
Adapter version:
Demo: applovin-demo-app
Stable release: solutionarchitectstech:applovin_adapter
Requirements
- Kotlin version >= 1.6.20
- Android 5.0+ (API Level >= 21)
Follow the steps described in the AppLovin SDK Integration documentation.
Custom Network Adapter Integration
- Add the following configuration settings to your app-level
build.gradlefile:
groovy
repositories {
    google()
    mavenCentral()
    maven { url 'https://jitpack.io' }
}
dependencies {
    implementation 'com.applovin:applovin-sdk:+'
    implementation 'com.github.solutionarchitectstech:applovin-sa-network-adapter:{{ version }}'
}- Provide init configuration for Android Ads SDK before AppLovin`s initialization:
kotlin
class YourApplication : Application() {

    override fun onCreate() {
        super.onCreate()

        AppLovinSdk.getInstance(applicationContext).mediationProvider = "max"
        AppLovinSdk.getInstance(applicationContext).provideSolutionArchitectsInitConfig(
            storeUrl = "YOUR_STORE_URL",
            sessionId = "YOUR_SESSION_ID",
            debugMode = true,
            headers = mapOf("Authorization" to { "Bearer YOUR_TOKEN" }),
            bannerUrl = "https://YOUR_BANNER_ENDPOINT"
        )
        AppLovinSdk.getInstance(applicationContext).initializeSdk()
    }
}- Also you can provide additional parameters for each ad unit:
kotlin
private fun createBannerAd() {
    adView = MaxAdView("YOUR_AD_UNIT_ID", this)
    adView?.setListener(this)
    adView?.provideSolutionArchitectsBannerParams(
        closeButtonType = CloseButtonType.Countdown(
            3000
        ), floorPrice = 3.21, currency = "RUB"
    )

    // Stretch to the width of the screen for banners to be fully functional
    val width = resources.getDimensionPixelSize(R.dimen.banner_width)

    // Banner height on phones and tablets is 50 and 90, respectively
    val heightPx = resources.getDimensionPixelSize(R.dimen.banner_height)

    adView?.layoutParams = FrameLayout.LayoutParams(width, heightPx)

    // Set background or background color for banners to be fully functional
    adView?.setBackgroundColor(Color.BLACK)

    val rootView = findViewById<ViewGroup>(R.id.root)
    rootView.addView(adView)

    // Load the ad
    adView?.loadAd()
}
Learn how to identify users in banner requests User ID (UID)
Custom SDK Network configuration
Add Custom SDK Network Settings
Follow steps from official documentation Applovin Max
- In the MAX Dashboard select MAX > Mediation > Manage > Networks.
- Then click
Click here to add a Custom Networkat the bottom of the page. TheCreate Custom Networkpage appears. Add the information about your custom network:Network Type- choose SDK.Name- type the desired name of your custom network.Android Adapter Class Name- put the following stringcom.applovin.mediation.adapters.SolutionArchitectsMediationAdapter
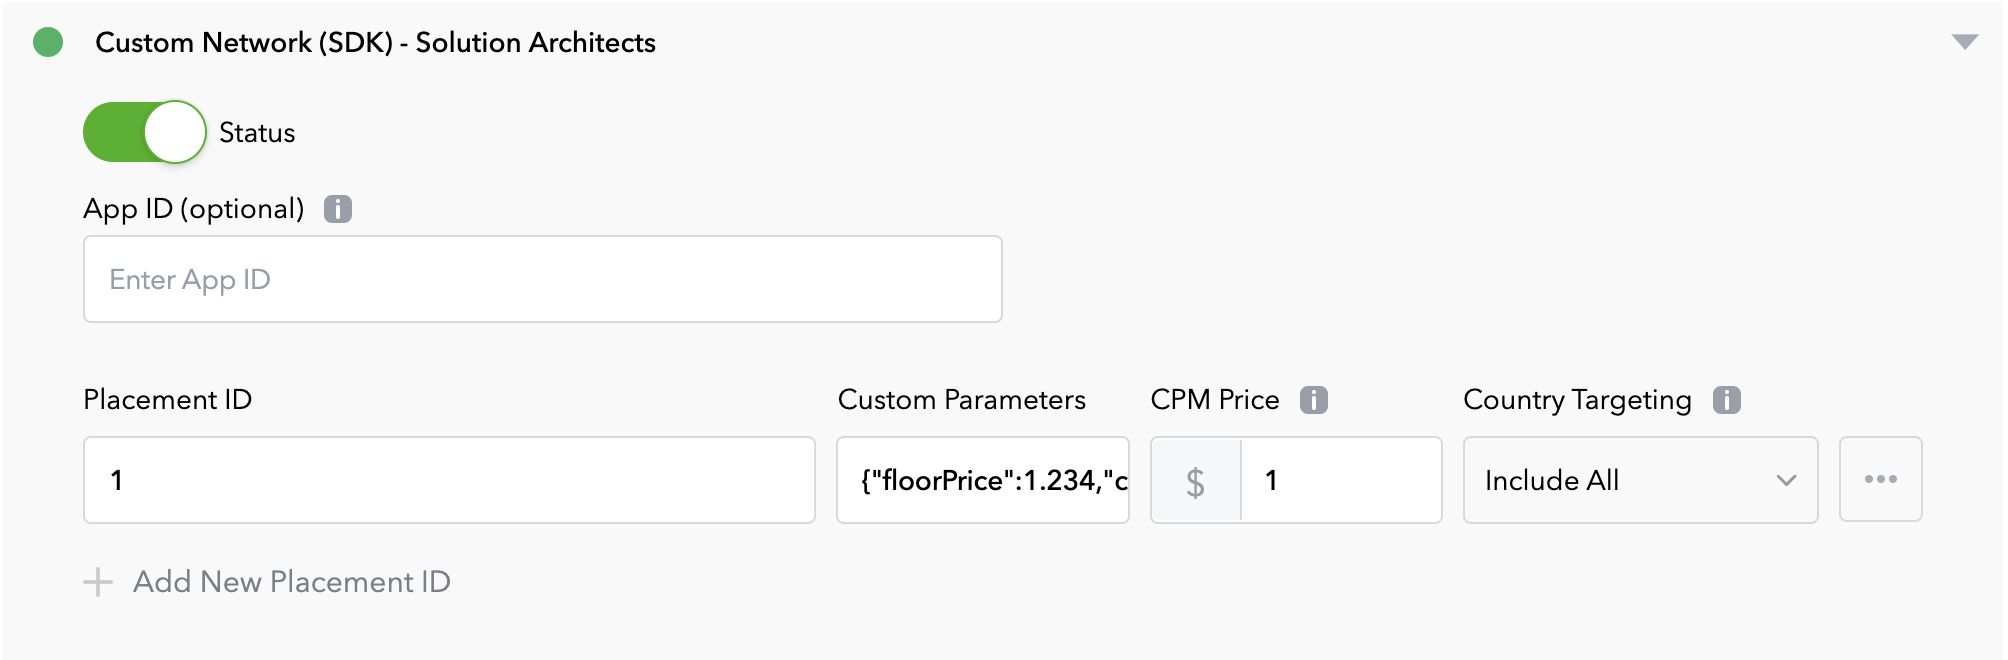
Enable network in your MAX Account
- Select the MAX ad unit placement on which you want to enable the custom network.
- Find section
Custom Networks & Dealsand unfold your network item. - Enable custom network by click on the
Statustoggle. - Set required parameter
Placement ID. - Set optional paraeters
App IDandCustom Parametersif you need.Custom Parametersfield should have the following format:
json
{"floorPrice":1.234,"currency":"RUB","exampleParam":"exampleValue"}- Set
CPMprice. - Select geo trageting in
Country Targetingfield.